Hi, my m8 box is stuck on first loading screen I have done the toothpick method to enter recovery mode but the remote is non responsive I then rebooted box entered recovery again this time with a USB mouse plugged in before power was restored, it is moving up and down on the menu to fast to select anything, I don't have a SD card but I do have a USB drive, now going forward I don't know anything about firmwares or updates on these boxes if I was to fully restore the box through USB with a new updated firmware I would need a guide of some sort with the correct methods explained as I don't have a clue lol but I'm sure I'll get the hang of it. If someone could help it would be highly appreciated.
↧
Need help M8 802 recovery
↧
DOLAMEE D5 (2GB+8GB) Android 6 firmware
↧
↧
please help
I have bought an M8 S802 box, and i want to install supersu soft, but i the box is blocked (also Google apps Device Policy doesn't work).
Can you please help me wit a proper stable firmware for this and maybe a proper way for instalation? I attached photos with the box, and system info.
Thank you very much,
Radu
Can you please help me wit a proper stable firmware for this and maybe a proper way for instalation? I attached photos with the box, and system info.
Thank you very much,
Radu
↧
Looking to get into android/linux dev work
Looking to get into various aspects of Android / Linux development work. I have a general understanding of binary / hex / etc. as well as good logic and problem solving skills. I am not quite sure where to start.
I feel like maybe I need to get myself familiar with terminal syntax , and various tree structures first. But would sooner follow the advice of those who have been there.
does anyone know of a good resource , that can get me started ? I know it's not gonna happen over night. Maybe if I sleep with book on my face.
any advice would be appreciated.
thanks
d§b
I feel like maybe I need to get myself familiar with terminal syntax , and various tree structures first. But would sooner follow the advice of those who have been there.
does anyone know of a good resource , that can get me started ? I know it's not gonna happen over night. Maybe if I sleep with book on my face.

any advice would be appreciated.
thanks
d§b
↧
minix announces lollipop for x8hp
ive made my choice: no minix device ever again!
still i am excited about this announcement:
http://www.minixforum.com/threads/of...1/#post-122949
still i am excited about this announcement:
http://www.minixforum.com/threads/of...1/#post-122949
↧
↧
Amazon Fire Game Controller
can someone confirm if Amazon Fire Game Controller works with android tv? Thanks
↧
USG Dongle Firewall Device Is Like A Condom For Your USB Ports
Always use protection! It’s a dangerous world out there for computer users. With malware, ransomware, botnets, and other schemes out to deprive you of your data, system resources, and even the cash in your wallet, users have to tread lightly when surfing the internet. However, as we’ve seen on many occasions, you can also find yourself under attack through direct means through the use of a device like a USB thumb drive.
That’s where the new USG dongle comes into play. The device is in essence a condom for USB devices, allowing you to enjoy all the benefits of device insertion without the side effect of DTDs — digitally transmitted diseases. USG acts as a USB firewall, protecting your computers from nefarious attacks like BadUSB.
![]()
The dongle has two USB connectors, each tied to its own ARM controller. Those two controllers then communicate with each other using a limited set of instructions, which would ward off BadUSB attacks (among others).
“The USG isolates BadUSB devices from your computer, while still passing through the data you need. The USG's firmware is fully open and auditable, so you can trust it,” states USG developer Robert Fisk. “And when you use a USG, you no longer have to trust the opaque firmware of dubious origin running on every USB device you own.”
![]()
At this point, USG v1.0 only supports a rather limited subset of USB devices including mice, keyboards and thumb drives. However, Fisk says that more USB device types will be supported in future USG firmware updates. He also notes that the device is OS-agnostic, so it can be used on Windows, Linux, macOS and embedded systems. Likewise, you won’t be able to use USG with a USB hub, so it’s recommended that you use one USG per USB device.
Fisk also says that while the USG can be susceptible to attack, it is a fruitless endeavor:
Via: Robert Fisk via Github
Source:
That’s where the new USG dongle comes into play. The device is in essence a condom for USB devices, allowing you to enjoy all the benefits of device insertion without the side effect of DTDs — digitally transmitted diseases. USG acts as a USB firewall, protecting your computers from nefarious attacks like BadUSB.

The dongle has two USB connectors, each tied to its own ARM controller. Those two controllers then communicate with each other using a limited set of instructions, which would ward off BadUSB attacks (among others).
“The USG isolates BadUSB devices from your computer, while still passing through the data you need. The USG's firmware is fully open and auditable, so you can trust it,” states USG developer Robert Fisk. “And when you use a USG, you no longer have to trust the opaque firmware of dubious origin running on every USB device you own.”

At this point, USG v1.0 only supports a rather limited subset of USB devices including mice, keyboards and thumb drives. However, Fisk says that more USB device types will be supported in future USG firmware updates. He also notes that the device is OS-agnostic, so it can be used on Windows, Linux, macOS and embedded systems. Likewise, you won’t be able to use USG with a USB hub, so it’s recommended that you use one USG per USB device.
Fisk also says that while the USG can be susceptible to attack, it is a fruitless endeavor:
The USG's firmware is as vulnerable as any other USB device out there. But the key point is that an infection cannot jump across the USG's internal firewall, so the other side of the USG is safe… Furthermore any infection cannot persist between restarts, because writes to internal flash memory are disabled on startup. So when you reinsert your USG to a different computer or to use a different device, you are starting from a clean state every time.
Fisk is building USG v1.0 by hand in New Zealand, and refuses to outsource production over features of the design being compromised. However, if you’d like to create your own USG v0.9, the instructions can be found here.Via: Robert Fisk via Github
Source:
↧
I need help please
Hi, my m8 box is stuck on first loading screen I have done the toothpick method to enter recovery mode but the remote is non responsive I then rebooted box entered recovery again this time with a USB mouse plugged in before power was restored, it is moving up and down on the menu to fast to select anything, I don't have a SD card but I do have a USB drive, now going forward I don't know anything about firmwares or updates on these boxes if I was to fully restore the box through USB with a new updated firmware I would need a guide of some sort with the correct methods explained as I don't have a clue lol but I'm sure I'll get the hang of it. If someone could help it would be highly appreciated.
↧
Rockchip OP1 in Samsung Chromebook Plus
Rockchip made the OP1 the world's most optimized Chromebook processor. OP1, also known as RK3399-C, Hexacore dual ARM Cortex-A72, quad ARM Cortex-A53 with Mali-T860MP4 GPU. Rockchip is the only chip maker which has been optimizing processors for Chromebooks over the past 3 years, with all the lessons they learned with the RK3288 quad-core ARM Cortex-A17 which shipped in several Chromebooks in 2015, they were able to improve on that, optimize every detail and in collaboration with Google and Samsung.
Source:Armdevices
Source:Armdevices
↧
↧
X96 Magendanz ROM with remote fix.
Thanks to Magendanz / SuperCeleron and Freak-Tab Team we have a Few working ATV ROMS
Now we have one for the X96 905X
There are a few glitches and some work arounds found. I will post links to things if needed. So here goes you are best to use keyboard mouse usb if possile for first set up and remote not software issue but the tricky remote. So heres whats working.
Bluetooth.
Ethernet
voice speach ( through play store remote apk ill post link)
FTMC - http://freak-tab.de/luis/Ftmc/FTMC-1...a-Build-23.apk - Thanks to Super Celeron
SPMC- https://github.com/koying/SPMC/relea...rmeabi-v7a.apk - Thanks to Koying
All the streaming apk I tried worked fine.
no bluetooth as device doesnt have one __
__
Net flicks - sd ( But not the play store version) I will post link to one I got working.
usb ports
IR port works
So as you can see ALOT working on this I think we all owe these Devs a huge bow (we not worthy type) And dig into your pockets and support them God the fixes just keep coming......
found fix power on power off with remote press power button (red one) then when you want to turn back on the device push number 2. How cool is that ON OFF WITH A PUSH OF THE BUTTON Funny how simple things just make me smile.
No playstore issues works
its actually fast smooth and runs stable.
flash and first boot takes some time
Grab it Below and enjoy its actually sweet.
Give me a bit to post a few more links in a bit for items i installed and liked.
NONE OF THIS WORK IS MINE AND ALL THE CREDITS GO TO THE FREAKTAB DEVS . I did drink a few beers /rye doing this so standard disclaimer it works great and if it blows up your lawn mower or dishwasher stops working or anything else stops working blows up catches fire implodes explodes or other wise stops working WASNT ME
STANDARD YOUR FLASH BACK WARRANTY. (See your warranty disappear as the flash tool progress bar reaches 100 percent my warranty stopped at 98 percent)
https://www.dropbox.com/s/tmrdd0z4wq...tvx96.img?dl=0
Now we have one for the X96 905X
There are a few glitches and some work arounds found. I will post links to things if needed. So here goes you are best to use keyboard mouse usb if possile for first set up and remote not software issue but the tricky remote. So heres whats working.
Bluetooth.
Ethernet
voice speach ( through play store remote apk ill post link)
FTMC - http://freak-tab.de/luis/Ftmc/FTMC-1...a-Build-23.apk - Thanks to Super Celeron
SPMC- https://github.com/koying/SPMC/relea...rmeabi-v7a.apk - Thanks to Koying
All the streaming apk I tried worked fine.
no bluetooth as device doesnt have one
 __
__Net flicks - sd ( But not the play store version) I will post link to one I got working.
usb ports
IR port works
So as you can see ALOT working on this I think we all owe these Devs a huge bow (we not worthy type) And dig into your pockets and support them God the fixes just keep coming......
found fix power on power off with remote press power button (red one) then when you want to turn back on the device push number 2. How cool is that ON OFF WITH A PUSH OF THE BUTTON
.gif "ROTFLMAO") Funny how simple things just make me smile.
Funny how simple things just make me smile.No playstore issues works
its actually fast smooth and runs stable.
flash and first boot takes some time
Grab it Below and enjoy its actually sweet.
Give me a bit to post a few more links in a bit for items i installed and liked.
NONE OF THIS WORK IS MINE AND ALL THE CREDITS GO TO THE FREAKTAB DEVS . I did drink a few beers /rye doing this so standard disclaimer it works great and if it blows up your lawn mower or dishwasher stops working or anything else stops working blows up catches fire implodes explodes or other wise stops working WASNT ME
STANDARD YOUR FLASH BACK WARRANTY. (See your warranty disappear as the flash tool progress bar reaches 100 percent my warranty stopped at 98 percent)
https://www.dropbox.com/s/tmrdd0z4wq...tvx96.img?dl=0
↧
Teardowns Nintendo Switch
At 8pm on Thursday, March 2, 2017, a long line of loyal Nintendo fans and **** resellers already formed around the block at San Francisco’s SOMA Best Buy. The new Nintendo Switch drops at midnight.
Naturally, we got in line, but unlike most fans who went home and played Zelda all night (and called in sick to work this morning), we raced to the Fictiv teardown operating room to bring you this breaking exposé as the newest in our beloved series of Nintendo Teardowns.
The Nintendo Switch system is a major evolution of the Wii platform. It’s both a home console and a handheld mobile device. The system is comprised of:![]() Nintendo Switch JoyCons
Nintendo Switch JoyCons
Out of all the things that are new and shiny about the Switch, I’m most excited about these JoyCons. I love their Lego-like modularity, in addition to the many different ways they can be used right out of the box. I’m sure Nintendo has lots of add-on accessories to be unveiled in the coming months—I’m such a sucker for multi-use, convertible products.![]()
![]()
Once you remove four #0 Y-tip security screws on the back of the JoyCon, the back enclosure comes right off.![]()
The battery in each of the JoyCons takes up almost the entire width of the controller and has a capacity of 525 mAh. It’s pretty easy to get to this point if you have a Y-tip #0 screwdriver, making DIY battery replacement a breeze.![]()
The JoyCon enclosure is effectively a 3-piece design:![]()
The light pipes in the side wall are pretty nifty—four identical light pipes nest into a little black plastic holder that provides masking and separation, and then this whole subassembly nests into the side wall together. This is so much cheaper than co-molded light pipes.![]()
Underneath the SL, SR, and sync buttons, we find small metal dome switches usually reserved for infrequent use.![]()
Here we have the Left JoyCon main PCBA. I was very surprised to find that the conductive-pad style switches used in generations of Nintendo controllers were replaced by metal dome switches. Conductive-pad style switches are virtually undestroyable and perfect for hard core gaming—only time will tell whether this change is a step in the right direction. This will definitely impact button feel as well.
Between the dome switches and the rigid button tops, the elastomer middle layer is still there. However, instead of having a conductive function like the previous generations, these are just for spring back.![]()
The trigger and shoulder switches are now just pushbutton switches. The trigger button uses two compression springs for spring back and as such, the travel distance is significantly reduced compared to older controllers.![]()
The joystick switch is the biggest surprise—it’s lost a lot of weight! The new low profile module is also more dust-proof compared to the older generation.![]()
Thanks to Apple leading the way with its Taptic Engine, everyone seems to be making more investment in high fidelity haptic feedback design. Eccentric rotating mass motors just won’t do anymore!
We found Nintendo’s own version of taptic engine in each JoyCon, called “HD rumble”. Although we didn’t fully open one up, it looks like a linear actuator, but several times larger than what we saw in the Apple watch.![]()
Aside from the Left and Right JoyCons having different functional buttons, the main difference in the Right JoyCon is the added IR camera module and NFC reader/writer.![]()
![]()
Lastly, let’s take a look at the mechanical enclosures again. They are made of PC-ABS and the walls are pretty stiff for being only 1.1mm thick in most places. Certifications and other markings are printed directly onto the plastic—the exteriors have a smooth matte finish achieved in-mold, but the interiors are unfinished, with the tool marks showing.![]()
The top and bottom enclosures have small alignment features along the lip in lieu of snap fits that we commonly see.![]() Nintendo Switch Wrist Straps
Nintendo Switch Wrist Straps
The wrist strap accessories attach to the JoyCon when they’re used in a Wii remote-like fashion.
We can see weld lines (also known as knit lines or meld lines) on the black plastic housing pieces near the button and light pipe openings. Weld lines are caused by resin having to flow around a core pin (used to form holes). Tuning molding parameters can reduce their appearance, but sometimes they can’t be completely eliminated due to the design of the part and mold. So don’t give yourself a hard time when this happens to you in the future—even Nintendo has to live with this sometimes!
Here are some noteworthy features: Spring-Like Connection Between Light Pipes
The spring-like connection between the light pipes allows the part to flex a little during assembly. The four individual light pipes have to each insert into a small window, and if it wasn’t for this spring-like design, the assembly would be crazy over-constrained and the tolerance stack up would cause huge headaches.![]() Wrist Strap Buttons
Wrist Strap Buttons
There are also two buttons on each wrist strap—because the wrist strap covers SL and SR buttons on the JoyCon, these two buttons provide pass-through button pushing. Two lightweight compression springs provide spring back.![]() Sheet Metal Rail
Sheet Metal Rail
The U-shaped sheet metal railing mates with grooves on the JoyCon side wall. The sheet metal rail is pretty beefy at 1.1mm wall thickness.![]()
![]() Wrist Strap Lock
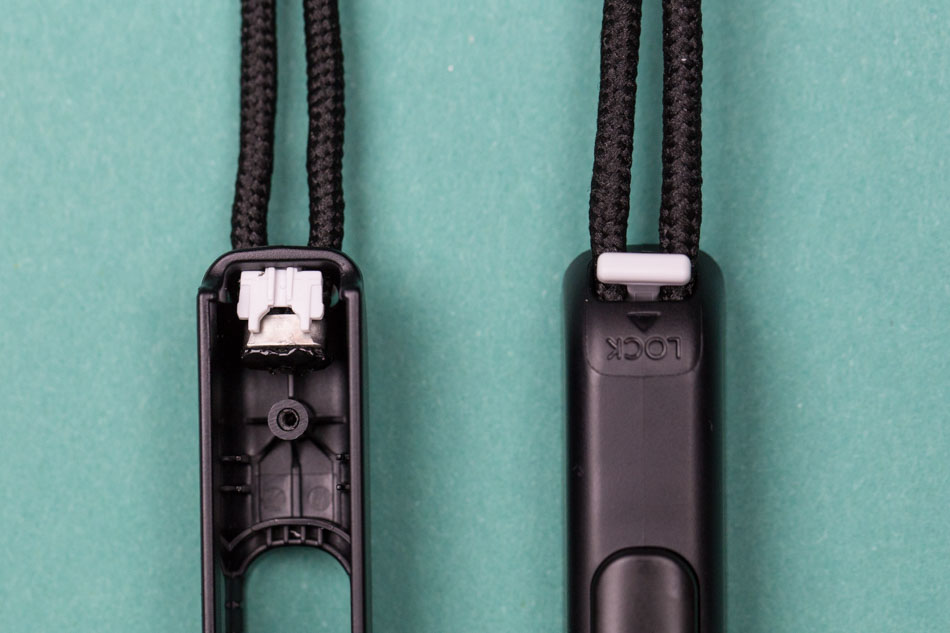
Wrist Strap Lock
There is a small white piece where the nylon wrist cords enter the wrist strap housing. This is a clever lock for the wrist strap. Once you press it in, the wrist strap can’t come out even if you accidentally depress the unlock button.![]()
The JoyCons and wrist straps fit together really well. They slide onto each other easily and once they lock, there’s only a barely noticeable amount of slack. Every mechanical engineer can appreciate how challenging and beautiful this is. Nintendo Switch JoyCon Grip
Same as the wrist straps, the JoyCon grip is a purely mechanical accessory. It’s very empty. Is anyone surprised about this?
The housing pieces are all made of ABS plastic and the walls are more than twice as thick as the JoyCon housing pieces because space is not a constraint and we have stiffening ribs galore. ABS is cheaper than PC-ABS, but less stiff and impact resistant and in this accessory, we have room to beef up the walls to compensate.
The rails on the grip are similar, but not exactly the same as those found on the wrist straps. I would be more excited if the same railing could be used everywhere…![]()
There are two elastomer bumpers that help constrain the JoyCon in place. This eliminates the need for super tight tolerance between the JoyCon and grip housing profiles.![]()
I get unreasonably excited about cool light pipes. In the grip we have a 90 degree light pipe that turns the side-firing JoyCon indicator lights towards the player.![]()
![]() Nintendo Switch Console
Nintendo Switch Console
The main Console is a rather heavy touchscreen tablet with attachment rails on the left and right sides. The attachment rails are painted black to blend into the rest of the console. Again, it’s not exactly the same part as the rails found on the wrist straps and the grip.![]()
Before we get into the unit, let’s take a moment to appreciate how pretty these speaker grills are on the back:![]()
However, after we take off the back enclosure, we discover these speaker grills are a big lie. They’re pretty much just stickers and what we see through the grill is just black tape. The speakers are not even located behind these grills. Why???!!!![]()
The back enclosure has very thin walls to minimize the overall thickness of the tablet. There’s no room for stiffening ribs—you can see how much it bends.![]()
The kickstand on the back is also quite thin at only 1.4mm, but it’s made of glass-filled nylon (one of the stiffer plastics used for injection molding). I can imagine the design engineers being given the requirement of not having the kickstand stick out of the back, but it needs to be strong so they had to optimize on material. I’m going to guess that if the kickstand were to fail, the hinge would be the culprit rather than the kickstand itself. The kickstand doubles as a cover for the microSD card slot.![]()
As we venture further inside the Console, it’s clear why the back enclosure doesn’t need to be very stiff. We first remove a sheet metal shield, then the PCBAs come out.![]()
![]()
The battery is 4310 mAh, which is undersized compared to the iPad Mini 4 (a tablet of similar screen size), which has a 5124 mAh battery.
Ultimately, all the interior components are fastened to a cast magnesium (AZ91D) skeleton. This gives the Console heft and all the rigidity it needs.![]()
I’m also fascinated by the thermal management features inside the Console—the GPU must get so hot. Here we have some still-gooey thermal paste:![]()
There’s a beefy bar of copper that travels from the main PCBA, past the fan, and terminates at an interesting heat sink, made of laser welded thin gauge sheet metal.![]()
![]()
The fan is larger than we expected, but it’s quiet enough when we spin the blades by hand. When we put this back together and play a few games, we’ll see how silent it really is.![]()
Finally, a look at all the rigid PCBAs.![]()
You’ve probably already seen the full PCBA analysis from that factory leak, so i’ll leave it at that! Nintendo Switch Dock
The dock is mostly empty space as well. A main PCBA provides a junction between the USB, A/C power, and HDMI. The Console docks into a USB-C connector; I’m happy to see the new standard finally catching on more and more.![]()
![]()
The large housing pieces are all ABS plastic, no surprise there!![]() Main Takeaways
Main Takeaways
Every generation of Nintendo controllers gets more compact. The JoyCons are packed pretty tight; the new low-profile joystick switch must have been a godsend to help minimize the Z-stack.
It’s also interesting that the grip is mostly empty space. The existence of this very accessory shows that classic gamepad forms are not going anywhere anytime soon. However, the ergonomics are a bit of a compromise, the buttons are not as big, placements are just a bit off, it’ll take some getting used to.
In true Nintendo fashion, we also see evidence of design for assembly considerations everywhere. Even parts that could be installed agnostic of direction are provided with affordances and cues so that assembly can only be done one way. Nintendo engineers don’t do ambiguity.
Overall, I’m impressed (as usual) by Nintendo’s attention to detail—from a mechanical design perspective, it’s a hit. The modularity makes a big statement: this is not a product, it’s a platform.
We can’t wait for the next Nintendo teardown… in 5 years. If you want some more in the meanwhile, check out our other teardowns, and subscribe to the blog so you don’t miss the next one.
Source:
Naturally, we got in line, but unlike most fans who went home and played Zelda all night (and called in sick to work this morning), we raced to the Fictiv teardown operating room to bring you this breaking exposé as the newest in our beloved series of Nintendo Teardowns.
The Nintendo Switch system is a major evolution of the Wii platform. It’s both a home console and a handheld mobile device. The system is comprised of:
- Console, a touchscreen tablet
- Switch Dock, a charging station and interface to connect to a TV
- Left & Right JoyCons, controllers reminiscent of the Wii Remote
- JoyCon grip, converts the Left & Right JoyCons to a more classic gamepad controller
- Strap attachments for the JoyCons
 Nintendo Switch JoyCons
Out of all the things that are new and shiny about the Switch, I’m most excited about these JoyCons. I love their Lego-like modularity, in addition to the many different ways they can be used right out of the box. I’m sure Nintendo has lots of add-on accessories to be unveiled in the coming months—I’m such a sucker for multi-use, convertible products.


Once you remove four #0 Y-tip security screws on the back of the JoyCon, the back enclosure comes right off.
The battery in each of the JoyCons takes up almost the entire width of the controller and has a capacity of 525 mAh. It’s pretty easy to get to this point if you have a Y-tip #0 screwdriver, making DIY battery replacement a breeze.

The JoyCon enclosure is effectively a 3-piece design:
- top enclosure
- bottom enclosure
- sidewall

The light pipes in the side wall are pretty nifty—four identical light pipes nest into a little black plastic holder that provides masking and separation, and then this whole subassembly nests into the side wall together. This is so much cheaper than co-molded light pipes.

Underneath the SL, SR, and sync buttons, we find small metal dome switches usually reserved for infrequent use.

Here we have the Left JoyCon main PCBA. I was very surprised to find that the conductive-pad style switches used in generations of Nintendo controllers were replaced by metal dome switches. Conductive-pad style switches are virtually undestroyable and perfect for hard core gaming—only time will tell whether this change is a step in the right direction. This will definitely impact button feel as well.
Between the dome switches and the rigid button tops, the elastomer middle layer is still there. However, instead of having a conductive function like the previous generations, these are just for spring back.

The trigger and shoulder switches are now just pushbutton switches. The trigger button uses two compression springs for spring back and as such, the travel distance is significantly reduced compared to older controllers.

The joystick switch is the biggest surprise—it’s lost a lot of weight! The new low profile module is also more dust-proof compared to the older generation.

Thanks to Apple leading the way with its Taptic Engine, everyone seems to be making more investment in high fidelity haptic feedback design. Eccentric rotating mass motors just won’t do anymore!
We found Nintendo’s own version of taptic engine in each JoyCon, called “HD rumble”. Although we didn’t fully open one up, it looks like a linear actuator, but several times larger than what we saw in the Apple watch.

Aside from the Left and Right JoyCons having different functional buttons, the main difference in the Right JoyCon is the added IR camera module and NFC reader/writer.


Lastly, let’s take a look at the mechanical enclosures again. They are made of PC-ABS and the walls are pretty stiff for being only 1.1mm thick in most places. Certifications and other markings are printed directly onto the plastic—the exteriors have a smooth matte finish achieved in-mold, but the interiors are unfinished, with the tool marks showing.

The top and bottom enclosures have small alignment features along the lip in lieu of snap fits that we commonly see.
 Nintendo Switch Wrist Straps
The wrist strap accessories attach to the JoyCon when they’re used in a Wii remote-like fashion.
We can see weld lines (also known as knit lines or meld lines) on the black plastic housing pieces near the button and light pipe openings. Weld lines are caused by resin having to flow around a core pin (used to form holes). Tuning molding parameters can reduce their appearance, but sometimes they can’t be completely eliminated due to the design of the part and mold. So don’t give yourself a hard time when this happens to you in the future—even Nintendo has to live with this sometimes!
Here are some noteworthy features: Spring-Like Connection Between Light Pipes
The spring-like connection between the light pipes allows the part to flex a little during assembly. The four individual light pipes have to each insert into a small window, and if it wasn’t for this spring-like design, the assembly would be crazy over-constrained and the tolerance stack up would cause huge headaches.
 Wrist Strap Buttons
There are also two buttons on each wrist strap—because the wrist strap covers SL and SR buttons on the JoyCon, these two buttons provide pass-through button pushing. Two lightweight compression springs provide spring back.
 Sheet Metal Rail
The U-shaped sheet metal railing mates with grooves on the JoyCon side wall. The sheet metal rail is pretty beefy at 1.1mm wall thickness.

 Wrist Strap Lock
There is a small white piece where the nylon wrist cords enter the wrist strap housing. This is a clever lock for the wrist strap. Once you press it in, the wrist strap can’t come out even if you accidentally depress the unlock button.
The JoyCons and wrist straps fit together really well. They slide onto each other easily and once they lock, there’s only a barely noticeable amount of slack. Every mechanical engineer can appreciate how challenging and beautiful this is. Nintendo Switch JoyCon Grip
Same as the wrist straps, the JoyCon grip is a purely mechanical accessory. It’s very empty. Is anyone surprised about this?
The housing pieces are all made of ABS plastic and the walls are more than twice as thick as the JoyCon housing pieces because space is not a constraint and we have stiffening ribs galore. ABS is cheaper than PC-ABS, but less stiff and impact resistant and in this accessory, we have room to beef up the walls to compensate.
The rails on the grip are similar, but not exactly the same as those found on the wrist straps. I would be more excited if the same railing could be used everywhere…

There are two elastomer bumpers that help constrain the JoyCon in place. This eliminates the need for super tight tolerance between the JoyCon and grip housing profiles.

I get unreasonably excited about cool light pipes. In the grip we have a 90 degree light pipe that turns the side-firing JoyCon indicator lights towards the player.

 Nintendo Switch Console
The main Console is a rather heavy touchscreen tablet with attachment rails on the left and right sides. The attachment rails are painted black to blend into the rest of the console. Again, it’s not exactly the same part as the rails found on the wrist straps and the grip.

Before we get into the unit, let’s take a moment to appreciate how pretty these speaker grills are on the back:

However, after we take off the back enclosure, we discover these speaker grills are a big lie. They’re pretty much just stickers and what we see through the grill is just black tape. The speakers are not even located behind these grills. Why???!!!

The back enclosure has very thin walls to minimize the overall thickness of the tablet. There’s no room for stiffening ribs—you can see how much it bends.

The kickstand on the back is also quite thin at only 1.4mm, but it’s made of glass-filled nylon (one of the stiffer plastics used for injection molding). I can imagine the design engineers being given the requirement of not having the kickstand stick out of the back, but it needs to be strong so they had to optimize on material. I’m going to guess that if the kickstand were to fail, the hinge would be the culprit rather than the kickstand itself. The kickstand doubles as a cover for the microSD card slot.

As we venture further inside the Console, it’s clear why the back enclosure doesn’t need to be very stiff. We first remove a sheet metal shield, then the PCBAs come out.


The battery is 4310 mAh, which is undersized compared to the iPad Mini 4 (a tablet of similar screen size), which has a 5124 mAh battery.
Ultimately, all the interior components are fastened to a cast magnesium (AZ91D) skeleton. This gives the Console heft and all the rigidity it needs.

I’m also fascinated by the thermal management features inside the Console—the GPU must get so hot. Here we have some still-gooey thermal paste:

There’s a beefy bar of copper that travels from the main PCBA, past the fan, and terminates at an interesting heat sink, made of laser welded thin gauge sheet metal.


The fan is larger than we expected, but it’s quiet enough when we spin the blades by hand. When we put this back together and play a few games, we’ll see how silent it really is.

Finally, a look at all the rigid PCBAs.

You’ve probably already seen the full PCBA analysis from that factory leak, so i’ll leave it at that! Nintendo Switch Dock
The dock is mostly empty space as well. A main PCBA provides a junction between the USB, A/C power, and HDMI. The Console docks into a USB-C connector; I’m happy to see the new standard finally catching on more and more.


The large housing pieces are all ABS plastic, no surprise there!
 Main Takeaways
Every generation of Nintendo controllers gets more compact. The JoyCons are packed pretty tight; the new low-profile joystick switch must have been a godsend to help minimize the Z-stack.
It’s also interesting that the grip is mostly empty space. The existence of this very accessory shows that classic gamepad forms are not going anywhere anytime soon. However, the ergonomics are a bit of a compromise, the buttons are not as big, placements are just a bit off, it’ll take some getting used to.
In true Nintendo fashion, we also see evidence of design for assembly considerations everywhere. Even parts that could be installed agnostic of direction are provided with affordances and cues so that assembly can only be done one way. Nintendo engineers don’t do ambiguity.
Overall, I’m impressed (as usual) by Nintendo’s attention to detail—from a mechanical design perspective, it’s a hit. The modularity makes a big statement: this is not a product, it’s a platform.
We can’t wait for the next Nintendo teardown… in 5 years. If you want some more in the meanwhile, check out our other teardowns, and subscribe to the blog so you don’t miss the next one.
Source:
↧
MXQ Pro+ 4K Bricked while changing build.prop
I have a MXQ Pro+ 4K from China which was running on Android 5.1.1 having 1GB of Ram. After restoring the stock build.prop the box is not going beyond MBOX screen (with distorted display). I tried to enter recovery using the recovery button inside AV socket but it not going into recovery and just boots to that MBOX screen only.
I have tried using AMLOGIC USB Flash Tool but that also fails. Tool recognises the box on HUB3-2 but gives error "[0x00101004]Erase bootloader/Lowper/Identify/Error result"
Now what to do and how to enter recovery to either wipe or reflash stock img???
I have tried using AMLOGIC USB Flash Tool but that also fails. Tool recognises the box on HUB3-2 but gives error "[0x00101004]Erase bootloader/Lowper/Identify/Error result"
Now what to do and how to enter recovery to either wipe or reflash stock img???
↧
Upgrading from Superceleron V2 to V3
Hi all
I need some ore help.
Im trying to flash my H96 pro via usb cable. (Male to Male usb plugged into usb port closest to power supply as advised)
When I reset the unit by holding in the reset button the unit boots i hear it connect to my pc then immediately disconnects and loads the TWRP menu.
How do I get it to stay connected to my pc so I can flash the new rom?
Thanks in advance.
↧
↧
Which KODI Should i get for RK3188 Q7 Android Box?
I finally managed to get my old media box running perfectly. Now it runs flawlessly but the stock KODI (aka XBMC) says it is pretty old so i uninstalled it and tried to install it via google play. But unfortunately nothing comes up when i search as KODI. so i did a little bit of research and found out that latest version of KODI does not support older Kitkat 4 android. So i went to their website to get the version that finally supported it. It is called 16.1. Now i have a problem. Which version should i download?
They have three options
ARM64-V8A
X86
ARM
Which one should i get for my box?
They have three options
ARM64-V8A
X86
ARM
Which one should i get for my box?
↧
[ROM] Mini M8S Nano Nexus ROMs
In the spirit of the Pure Nexus Project, these Nano and Stock Nexus ROMs prove that less can be more. The goal is to keep true to Google's vision and use the bare minimum of OEM or third-party apps or add-ons, which can be added à la carte by the user as needed. These ROMs will also serve as a foundation for TVStock Nexus ROMs, which deliver the pure Android TV experience using the Open GApps TVStock Package.
Nano Nexus variant includes:
Nano Nexus variant includes:
- Open GApps Nano Package
- Google Now Launcher (replaces Lighthome Launcher)
- Google Chrome Browser (replaces AOSP Browser)
- Google Legacy Camera (replaces AOSP Camera)
- Google Desk Clock (replaces AOSP Desk Clock)
- Google WebView (replaces AOSP WebView)
- File Manager v3.0.0 and Sound Recorder v6.0.1 from CyanogenMod/LineageOS
- Terminal Emulator for Android v1.0.70 by Jack Palevich
- SuperSU v2.79 by Chainfire
- TWRP Recovery 3.0.2-0 from TeamWin
- Latest official Mini M8S ROM build (rv105L3) stripped to Android stock bits and latest Open GApps build
- New Amlogic S905 boot logo (replaces generic Google TV)
- Stock Android boot animation
- Exposed regular Settings app in launcher. The Leadback TVSettings.apk is renamed "TV Settings" (and removed in Nano variant).
- Switched display density from DENSITY_HIGH (240dpi) to DENSITY_TV (213dpi), which gives more screen real estate and fixes label clipping in Google Now Launcher.
- Updated icons and layout of navigation bar to center main three buttons and provide better spacing.
- Removed underlying Amlogic ROM dependency on AOSP WebView.
- Changed build characteristics to report as "tablet", instead of "mbox" to address some app compatibility issues.
- Included OTA updaters that can be installed in TWRP without wiping user data.
- Google Setup Wizard might block completion without a WiFi connection. Workaround is to skip everything and sign in through Play Store.
- Nano Variant: BURN PACKAGE (744MB IMG file). OTA UPDATE (387MB ZIP file)
- TVStock Variant: (Coming soon...)
- Flash burn package with Amlogic USB Burning Tool v2.0.8 or BootcardMaker v2.0.0.2
- The updater is signed, and so can be installed in the Update & Backup app, the stock recovery, or TWRP. It's designed for incremental updates, since user data is preserved. Bootloader, logo, boot partition and system partition are included, but not recovery.
- Flash ROMs at your own risk and always remember to back up your data first. The burn package includes a factory reset
- Maarten Fonville at Open GApps
- TeamWin for TWRP Recovery
- LineageOS Project
- Pure Nexus Project
- Chainfire
- Jack Pelevich
↧
New firmware v1.3.0 Beta ZIDOO X9S released
Zidoo is going to bring two mainly function to users.
1,Full Blu-Ray menu support in native player(support BD java menu).
Zidoo Filemanager (or Theater) will allows users to play Blu-Ray in menu navigation mode, besides a simple mode.
2,A new external subtitles system with rich settings and ASS/SSA support.
Support SRT/SMI/SUB..etc
Especially support ASS special effects in native player
Support HTML TAGS , It's not filter,but display the effect like italic.
Support custom fonts. It even allow user to add new font files into the box system.
Support custom shadow and strokes for srt subtitles.
Users are free to choose new subtitles system or the old one.
Thanks for the effort of engineers.
Some functions are still on testing stage which means some imperfections exist ,
Comments and suggestions are very welcome as always.
Update list,
System:
1,Add Blu-Ray Menu Navigation support.
Filemanager:
1,Eliminate the special gibberish filename in NFS share
Theater:
1,Add episodes order
Player:
1,User can add subtitles from NFS or SMB share(the default path is the video path, and you can cancel subtitle dialog by menu button).
2,User can save the subtitles be added which also can be deleted in advanced settings.
3,Add a new subtitles system. The old one also be retained. User can switch the new and the old in advanced settings.
4,The new subtitles support ASS special effect,SUB picture subtitles and SRT, SMI,TXT,etc.
5,Improved UI.
HDMI:
1,Canceled the limitation of record file size when the save storage format is not vFat (record 4G file problem).
Full_OTA_Package:
Mediafire mirror
Amazon mirror
中国境像:http://pan.baidu.com/s/1pLe26gj 密码:eapg
MD5:451039fc4b8851978f07166e465143ee
How to upgrade
![]()
![]()
![]()
![]()
![]()
![]()
![]()
![]()
![]()
![]()
![]()
![]()
![]()
![]()
![]()
![]()
![]()
![]()
![]()
![]()
![]()
![]()
![]()
![]()
![]()
![]()
![]()
![]()
![]()
![]()
![]()
![]()
![]()
![]()
![]()
![]()
![]()
Source :Zidoo
1,Full Blu-Ray menu support in native player(support BD java menu).
Zidoo Filemanager (or Theater) will allows users to play Blu-Ray in menu navigation mode, besides a simple mode.
2,A new external subtitles system with rich settings and ASS/SSA support.
Support SRT/SMI/SUB..etc
Especially support ASS special effects in native player
Support HTML TAGS , It's not filter,but display the effect like italic.
Support custom fonts. It even allow user to add new font files into the box system.
Support custom shadow and strokes for srt subtitles.
Users are free to choose new subtitles system or the old one.
Thanks for the effort of engineers.
Some functions are still on testing stage which means some imperfections exist ,
Comments and suggestions are very welcome as always.
Update list,
System:
1,Add Blu-Ray Menu Navigation support.
Filemanager:
1,Eliminate the special gibberish filename in NFS share
Theater:
1,Add episodes order
Player:
1,User can add subtitles from NFS or SMB share(the default path is the video path, and you can cancel subtitle dialog by menu button).
2,User can save the subtitles be added which also can be deleted in advanced settings.
3,Add a new subtitles system. The old one also be retained. User can switch the new and the old in advanced settings.
4,The new subtitles support ASS special effect,SUB picture subtitles and SRT, SMI,TXT,etc.
5,Improved UI.
HDMI:
1,Canceled the limitation of record file size when the save storage format is not vFat (record 4G file problem).
Full_OTA_Package:
Mediafire mirror
Amazon mirror
中国境像:http://pan.baidu.com/s/1pLe26gj 密码:eapg
MD5:451039fc4b8851978f07166e465143ee
How to upgrade
↧
Beelink MINI MXIII II gamepad mapping problem.
Hello,
I just bought Beelink MINI MXIII II, I thought I will install some old emulators and roms, as I really enjoy retro gaming.
I bought sixaxis controller app, I connected my PS3 gamepad, but it wasn't working as I expected.
When i'm clicking for example start button on my gempad, it's moving me to the launcher apps. menu, when I'm pushing up arrow, it's moving me to file browser ap. I thought it's because of remote key mapping? What should I do? I really want to play some games, I bought it mostly because of it.
↧
↧
Custom Recovery
Could someone point me in the right direction to get a Custom Recovery on these devices so I can do a Backup? Im sort of a noob and looked everywhere, but I'm not getting anywhere. Any help would be appreciated. I have the: T95U PRO. Thanks
↧
RUPA I68
Greetings freaktabs
I have Been browser of this forum for while
And I recently bought a android box from amazon
Great buy I thought...I turned it off and went out
And when I came home I turned it on and and was stuck
On google TV screen I contacted the seller and they
Was not helpful I ask for firmware and I got a link from them and it was error 404 I did ask them too upload it
On another host they said too big (600mb).
Any way a long story short does anybody know of this box or know what firmware would work on it.
The spec's RUPA i68 Android 5.1 TV Box 2G 8G RK3368 Octa Core AP3360 Smart WiFi 1000M BT 4.0
Also link to a site with bit more http://buystreamingmediaplayer.blogs...id-51.html?m=1
If anybody knows or has any advice on where or do
Have firmware please share with me I would highly
Appreciate all info I could not find nothing and I looked all over the web and I can not find no firmware
in which I found very odd
Also if screen shots of board are needed I can post too!
↧
SD Card A2 (Application Performance Class 2) and UHS-III for up to 624MB/s speed
SD Card Association, the standard organization of SD cards, just released two new specification meeting new market needs.
The first is Application Performance Class 2 (A2) – a new performance class that consider Random & Sequential performance meeting the new need of storing and running applications from cards allowing means to consumers which cards to purchase in point of sale meeting their products needs. Coming after A1, introduced last November, A2 is a higher level of performance enabled by new features supported now by SD – like command Queuing and Cache.
The second enhancement of the standard is UHS-III. It is enhanced physical interface that enables byte rate of up to 624MB/s!
I am hoping that some device makers will implement devices with 2 or more microSD slots to increase the total available maximum capacity and even doubling the speed if a parallel access can be allowed.
Source arndevice.net
↧